
WARNING
Never remove the antenna without first ensuring that transmit (TX) is disabled in settings. These radios automatically transmit periodic updates to the mesh, and damage will occur if the radio happens to transmit while the antenna is removed. This applies even to quick antenna swaps. The TL;DR is to NEVER under any circumstances remove the antenna without first ensuring that TX is disabled in settings: Settings > Radio Configuration > LoRa > Transmit Enabled (toggle off)
DON’T HESITATE TO CONTACT ME IF YOU HAVE ANY QUESTIONS! THE ONLY SILLY QUESTIONS ARE THE ONES YOU DON’T ASK!😉
A note about this guide: This guide focuses on my own radios’ unique features and isn’t intended to be expansive, so please refer to the vast online resources for general learning about the Meshtastic protocol. Please also be mindful that Meshtastic (and Meshcore etc.) is an open source project in beta, and therefore it’s constantly changing and evolving as the developers make updates to the protocol, as well as to the various clients and apps. That being the case, it’s likely that some of the information in this guide may be outdated. I will try to keep it as up to date as possible, but the reality is that things are progressing faster than I can keep up with. If you’re having trouble locating a setting, it’s likely that the name or location has changed, so you may have to apply some common sense critical thinking. If in doubt, the best source for the latest up to the minute information for any given application or related bugs is the official Meshtastic Discord: www.discord.com/invite/meshtastic. If all else fails, contact me and we can figure it out together!
QUICK SETUP
Install antenna: If it’s not already installed, screw the antenna onto the connector finger tight, being careful not to overtighten.
Plug in node: Even if your model has an integrated battery, it may be in deep sleep or depleted, so plug it into an external power source to wake it up. Remove silicone plug and power via USB-C cable (not included) from a 5v source (e.g. USB port, wall charge adapter, etc.). Note: Base Stations (MBS) don’t have integrated batteries and must be plugged into an external power source (namely 5v solar) to work.
Pair node with smart device: Install Meshtastic app on smart device (make sure Bluetooth is enabled on smart device and enable all app permissions). Meshtastic is available for both Android and iOS. Go to Connect tab in Meshtastic app and connect radio (PIN is 123456).
Set your LoRa region: Before the node will function, you have to set your region so it knows what frequency to use. Settings > Radio Configuration > LoRa. The app may prompt you to do this once the Bluetooth connection is established.
Change Bluetooth PIN (optional): Change factory default PIN by going to Settings > Device Configuration > Bluetooth > Fixed Pin, enter your own PIN, then hit Save. Note that you will have to “forget” the radio in your smart device’s Bluetooth settings to clear the factory default PIN, then reconnect the node in the app with the PIN you just set. This can be done later if you want to skip for now.
Change Position setting for Primary channel (optional): The default setting is to broadcast your approximate location to the public mesh. To disable, go to Settings > Channels > Primary Channel > Position. Toggle off and hit Save (node will restart). Note that this will not affect position sharing on encrypted channels (more on that later). This can be done later if you want to skip for now.
Turn on transmit: Nodes are shipped with transmit disabled for safety, so you must re-enable it in app before you can send messages. In app, go to Settings > Radio Configuration > LoRa > Transmit Enabled. Toggle on and hit save (radio will restart). NEVER remove antenna without re-disabling TX!
Send a message: Send a message (e.g. “Radio check”) on the Primary channel by going to Messages > Channels > Primary Channel. If there are other users within range, you should see “Acknowledged” appear under the message (indicating another node has received it), and you may get replies. You should also see nearby nodes start to populate in the Nodes tab (and on the Map) within a few hours if there is any significant public mesh in your area. If you don’t see any activity, it’s probably because there aren’t any active users within range, so you will need to set up a second radio before you can do a successful test.
ADVANCED SETUP
Set custom name: You can rename your node by going to Settings > Device Configuration > User and changing the Long and or Short names. Note that Short Name is what appears on the node icon as seen by other users and may be an emoji. Keep in mind that both names are broadcast to the public mesh, so don’t use personally identifiable information. Note that it’s helpful to write the node’s short name on the housing.
Set up private channel: Never encrypt the Primary channel, as you will break your connection to the public mesh. Don’t change any primary channel settings (other than the Position, as mentioned in the previous section). Encrypt one of the other channel slots and set it to Secondary (Settings > Channels > Add Channel). The channel name is like a user name, and the encryption key is like a password. Anyone else with those credentials can send and receive encrypted messages over that channel. Set Position to precise, as only the people you give those credentials to will be able to see your location.
Specify Role: The radios come set to Client, which is the default standard role for mesh nodes. If you intend to use ATAK (or iTAK), change that to TAK (Settings > Device Role > TAK). Otherwise, Client is probably what you want. DO NOT set any Router/Repeater roles unless you’re 100% sure it’s appropriate, as you may break your local mesh. In general, Base Stations (MBS) should be set to Client Base.
Choose LoRa Preset: There are several presets that balance range with data rate (Settings > Radio Configuration > LoRa > Presets). Long-Fast is the default, so it serves as kind of like a “national calling frequency” equivalent for Meshtastic. I.e. if you’re lost in the wilderness and need to send an SOS, Long-Fast is likely the preset that’s going to get you found. Medium-Fast can handle more traffic so it’s more common in cities, and Long-Slow extends range at the expense of traffic handling, so it’s often used by rural users, especially if there’s no public mesh in their area yet. Message boards and social media groups for local meshes are the best place to find out which preset is most prevalent in your area. If all else fails, just try them out to see what’s out there, starting with Long-Fast. Send a message (e.g. “Radio check”) on the Primary channel from different locations and see who responds or what nodes populate in the Node List and on the Map.
Note: It’s best practice to use underscores in lieu of spaces for names, as spaces don’t always show up in all applications (e.g. “My Channel Name” might look like “MyChannelName” so use “My_Channel_Name” instead).
Model-Specific Information
MBS: Mesh Base Station
Designed to be semi-permanently installed in an elevated, fixed location and hop low volume local traffic, base stations will generally have a high gain collinear or yagi antenna, large batteries and solar power. MBSs will generally be installed on residential rooftops, in trees, etc. They hop your local traffic node to node, as well as into the public mesh if there’s one available. Structures and vegetation can make it difficult to ping nearby nodes even if you have line of sight, so even just getting a high gain antenna on your roof can make a world of difference.
Since they’re fixed, they don’t contain GPS modules (which saves power, reduces size and lowers cost), so set their role as Client Base (NEVER router) and in the Position settings select Fixed Position (be sure to give the app full GPS privileges on your phone, or manually enter GPS coordinates using the web client). I recommend disabling Bluetooth in settings, as it’s not generally useful in this application, it depletes battery and it might interfere with your signal.
I designed the base nodes to essentially be an antenna with a node on it, with the power ported remotely, which has quite a few advantages. Namely, it keeps the coax and connectors from the radio to the antenna to an absolute minimum, which is critical for signal integrity given LoRa’s extremely low power output. This overall strategy of slaving the node to the antenna and porting out the power also removes the primary wind load (the solar panel) from the equation, allowing you to get the antenna up in places that otherwise wouldn’t be able to support the weight and wind load of the solar panel and batteries (like in tree canopies or on lightweight antenna masts (or–better yet–on lightweight antenna masts in tree canopies!😁)). My strategy also allows more flexibility in placing the panel for optimal efficiency, as the location where the node goes isn’t always conducive to solar, like in a tree where the leaves will shade it. Even if the panel isn’t shaded, it’s hugely helpful having it down lower where it’s easier to access for cleaning, as they do build up quite a bit of dust, which dramatically impacts their efficiency. In extreme climates, whether hot or cold (think Arizona and Minnesota), you can also separate the battery from the panel and place it somewhere more temperature stable (even in the ground if necessary).
The general installation scheme is to place the node/antenna portion as high up as possible, then place the solar panel/battery portion down lower, where the USB-C cable end can be accessed more easily, like from a step ladder, for changing settings and updating firmware. So a typical residential installation would have the node/antenna near the peak of the roof, and the panel/battery mounted to an eve. The power draw is extremely low, so don’t hesitate to share the panel from other devices via a splitter (just make sure the voltage is correct (5v DC)). One advantage to that scheme is it will look like it’s part of your home security system, which will cut down on the prepper vibes of having an obvious mesh node on your roof (and HOAs generally don’t discriminate against home security, whereas they usually explicitly forbid amateur radio equipment). Meshtastic CAN indeed be part of your home security and automation, as well, with an already expansive variety of sensors for those purposes already on the market, so you don’t even have to lie to your HOA or property manager! You can also call it a “LoRa IOT” device, which is truthfully a better answer, as these devices support MANY protocols besides MT/MC.
Special consideration is needed for changing settings and updating firmware. Depending on how high up it is, you might get a good enough Bluetooth signal to do over the air firmware updates, but as of this time those are highly unreliable, so it’s recommended to just disable Bluetooth and update via serial connection by simply plugging your PC into the node’s USB-C cable and updating via the web flasher, using the drag and drop method. Please note, however, that use of USB extension cables, while fine for powering the node, may cause the flash to fail, in which case the device may become unrecoverable! So while it’s perfectly fine to power the node with extension cables, extreme caution is needed if trying to flash firmware through them. If you do decide to flash firmware via extension cables, make sure to use a high quality ACTIVE USB-C cable, and test everything thoroughly first! For example, experiment with changing settings first, before attempting to flash firmware, and make certain that the cable is rated for the necessary transfer at whatever length you’re using.
While the primary intent behind these base nodes is for residential applications at typical roofline height, there’s nothing in terms of the radio transceiver itself that would preclude them from serving as higher value nodes in elevated positions, if you happen to have something really tall you can mount them to. They are also a lot stealthier by nature than most nodes intended as routers due to their low power consumption and streamlined hardware. The only limitation is how long your cable run can be for both powering and updating. Providing power over long runs of wire is relatively easy and inexpensive, as it’s just a matter of increasing the wire gauge the longer the run. Thin wire like 20-24 AWG can power them up to 25-50 feet, 18 AWG can go 100 feet, etc. Refer to wire gauge charts to ensure that your wire gauge is sufficient for your intended run.
Providing a solid data connection over long runs is difficult, though, and expensive. Active USB cables are relatively reliable and inexpensive at 10-25 feet or so, but trying to go over 50 feet becomes increasingly more expensive and challenging. For runs of 50 feet or more, the most cost-effective and practical strategy is probably going to be to break out the 5v and GND wires from the node’s USB cable and run your power and data lines separately (i.e. use appropriate two conductor copper cable to route power and a separate fiber cable to route data). There’s also POE. It is theoretically possible to transmit both power and data over up to several hundred feet, but at a certain point you have to start asking yourself if it’s worth it, and whether it wouldn’t be better to just build a high value router. You also have to consider that the higher up it is, the more traffic it will receive, so at a certain point you will have to set it to not hop traffic from any nodes not your own, which is not very respectful to the mesh unless you completely isolate your mesh from the public, which really doesn’t help anyone. So if you’re finding yourself in the fortunate position to have to be considering these things, you might just want to bite the bullet and build an ESP32 router with Wi-Fi, that can handle a large volume of traffic and provide a public MQTT access point.
MHT: Mesh Handheld Transceiver
Designed to be carried on a person, they are small, ruggedized, and have low gain antennas with a broad radiation pattern and a built in counterpoise, so they aren’t picky about orientation or ground plane. Since these are designed to be used in conjunction with a smart device, which presumably has a GPS of its own, they don’t have onboard GPS modules (to save power, reduce size and lower cost), so be sure to give the app GPS privileges on your phone).
MMT: Mesh Mobile Transceiver
Designed to be mounted to a vehicle, these will have large batteries, solar charging, antennas that capitalize on the vehicle’s large ground plane, and onboard GPS modules.
TROUBLESHOOTING
Resetting the node will immediately solve most issues (see next section NOTES ON RESET BUTTON). Go ahead and also restart the app on your phone for good measure!
Bluetooth pairing issues not fixed by resetting the node/app are most often fixed by forgetting the node in your phone’s Bluetooth settings and then reconnecting the radio in the app.
You can also reset the app settings (Settings > App Settings > Reset App Settings).
A peculiar error can occur when you try to direct message nodes and the app says something along the lines of the key not matching or no channel, which generally means some identification setting like the name or public key of that node has changed since being discovered. If you’re sure it’s safe, you can generally get around this by unfavoriting and refavoriting that node in the Node List. If that doesn’t work you can forget the node and let it be rediscovered, which will update its information.
If your location is incorrect on the map, you may need to give the app permission to access your phone’s GPS in the phone’s settings. At the time of writing this, there is a known issue with some iOS users being unable to get an accurate location fix due to Apple’s privacy settings.
If issues still persist, factory resetting and reflashing the firmware will help rule out any non-hardware related issues. Your firmware may be an unstable version or out of date. Also make sure you’re running the latest app version on your phone. On base stations, don’t attempt to flash firmware using extension cables unless you’re absolutely sure the cable can transmit the data. If you do choose to use an extension cable, make sure it’s a high quality ACTIVE USB-C cable, and do lots of testing, as a failed flash will likely result in the device being permanently unrecoverable.
NOTES ON RESET BUTTON
The reset pin is wired to an M2 socket cap screw (location varies depending on model). You can reset the device by shorting it to the antenna connector’s hex nut (simply using a metal object like a paper clip to connect the two together). If the device is painted, you will need to scratch away a little bit of the paint to expose bare metal. A very brief “tap” is all it takes (if you hold it too long the node will see that as a double tap and put it into DFU mode, so if the node doesn’t respond try a faster tap). This is primarily to recover the node if it malfunctions in the field. For normal operation like updating firmware, it’s easiest to control it via the app or web client. Naturally there exists the remote possibility of something metallic in your pocket or bag shorting them unintentionally, so painting them or putting some electrical tape around any exposed portion of the antenna connector will preclude that remote possibility.
If you have a BLE connection you can also reset them via the app (Nodes > (your node) > Reboot).
NOTES ON ANTENNAS
The antenna market for Meshtastic is the wild west. I highly recommend the TEC ANT-916-CW-HW-SMA for handhelds (mobile and base applications require specific consideration). If you choose to use a different antenna (you do so at your own risk), please use extreme caution, as there are lots of antennas on the market that are not only subpar but will even damage radios. If you do decide to experiment with other antennas, NEVER use any antenna that’s not expressly designed for the ISM 915mhz band (keeping in mind that many antennas marketed as such are out of band), or that doesn’t have a real SMA connector. I leave as much of the radio side SMA protruding as possible so as not to preclude the use of a counterpoise by advanced users, so fake SMA connectors that rely on the antenna body’s shoulder for indexing of the center pin WILL damage the radio’s SMA connector and potentially destroy the radio itself (if it breaks electrical continuity the radio will burn itself out). Even if you shim these fake SMA antennas, the impedance will be unpredictable, potentially leading to a high enough SWR to damage the radio in a perfect storm scenario (users have reported SWRs approaching 3 with such antennas, which is the threshold for damage to the transmitter). I would also add that suppliers who won’t spring for a proper SMA probably aren’t too concerned with them being in band, either. SMA connectors rely on EXTREMELY precise indexing of the center pin, and a good connection between the two shells for proper ground, which yields a repeatable 50 ohm connection. The male SMA shell nests inside the female shell, and there is also a tapered shoulder that provides the proper airgap between the two PTFE dielectrics surrounding each connector’s center pin. Close enough simply isn’t good enough when it comes to antenna connectors.
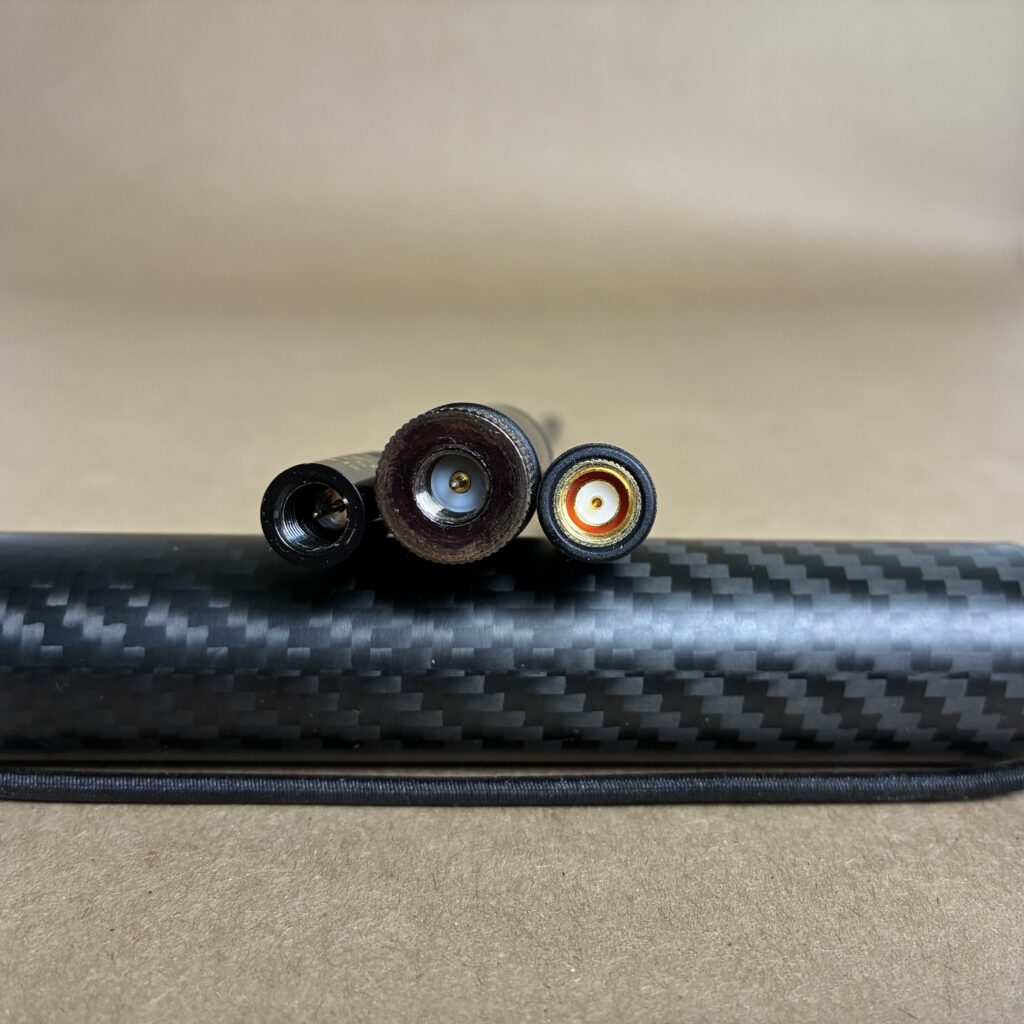
Also note that there is “SMA” and “RP-SMA,” with RP-SMA having the male center pin on the female connector. All of my radios take SMA male antennas (besides the base stations, which take N-Type male antennas). Note that 915mhz RP-SMA antennas are EXTREMELY common, and getting them mixed up will absolutely cause damage one way or another (i.e. either the “dueling pins” will bend each other, or, in the opposite case of two females, the lack of any electrical connection resulting from an RP-SMA antenna on an SMA radio will burn out the transmitter as it’s effectively transmitting without any antenna). Lots of mesh nodes are supplied with RP-SMA connectors and antennas (probably a third of them), so make sure you know the difference before swapping antennas between different devices. Even different models from the same manufacturer often use different standards.
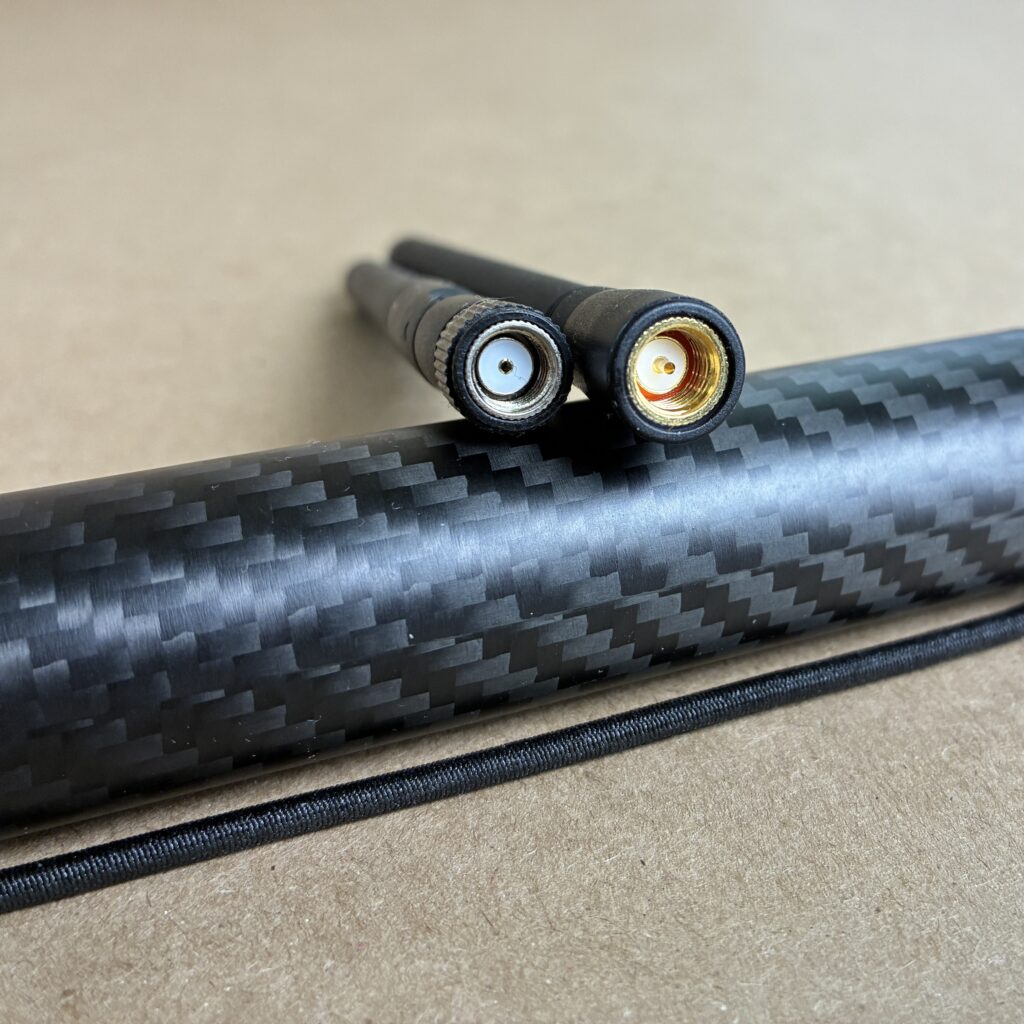
NEVER use SMA to N-Type adapters, as the strain of those antennas is too great for SMA connectors and will likely lead to damage. SMA connectors are quite delicate and easily damaged, so try to opt for shorter more flexible antennas like whips and ducks vs rigid ones with hard plastic shells. High gain antennas are also not ideal for handheld radios because they require good placement to be effective, as they concentrate the signal in a much smaller area, thus requiring much more intentional placement. For radios carried on your person, you want a lower gain whip antenna with a broad radiation pattern (omnidirectional with maximum gains in the range of 0-3db).
For base stations, only use antennas with included mounts, where the antenna itself is mounted to the structure, with the node hanging from the antenna. Never mount the node itself to the structure, as the connector isn’t designed to carry the weight and wind load of a high gain fiberglass antenna.
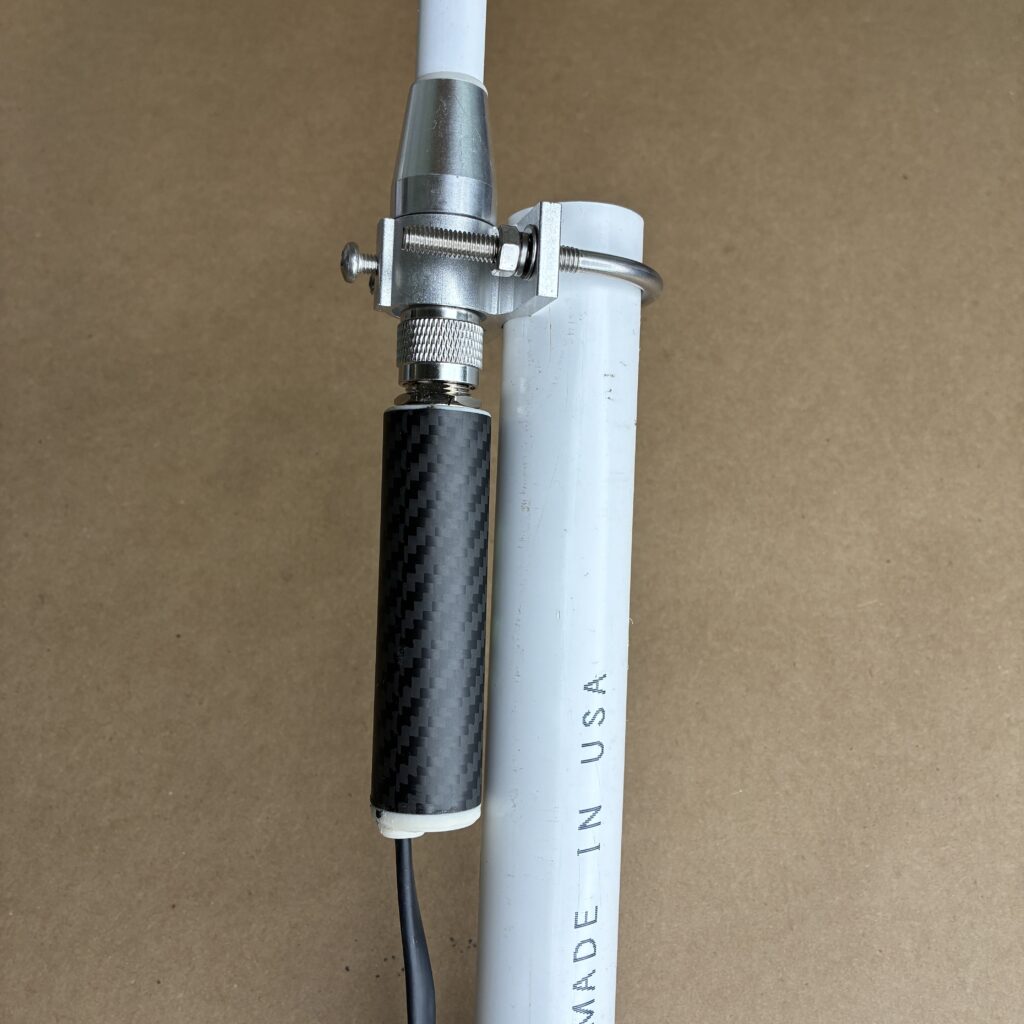
Also be cautious with adapters with coax extensions. While this will relieve the strain on the radio’s connector, the coax and additional connections will eat up your signal, and when you’re talking about Meshtastic’s 20db output it doesn’t take much to reduce your signal to the extent that any range you may have otherwise gained with a larger antenna will be canceled out by weakening and degrading your signal. If using such a setup, make sure you’re using very high quality connectors and coax cable, and keep coax runs to several feet max (ideally six inches or less).
Also keep in mind that these radios have very small ground planes, so try to only use antennas that have a built-in counterpoise (like the aforementioned TEC). Most antennas require about a 100mm square ground plane to get the advertised performance, and many that are designed for vehicle applications require several square feet of ground plane. Unless you’re highly skilled when it comes to improvising ground planes, it’s best to stick with antennas that have a built in counterpoise. Note that fiberglass antennas generally don’t require ground planes either.
If you choose to paint the antennas, make sure to use paints that don’t contain any carbon or metal pigments. Blacks and grays are usually carbon and or metal, but earth tones are usually organic pigments that don’t interact with RF. Anything will attenuate the signal though to at least some extent, so only paint them if absolutely necessary and use the absolute minimum you can. Make sure you mask any connectors as the paint will insulate them and affect impedance.
Most importantly, NEVER swap antennas without first disabling Transmit (TX) in the settings (Settings > Radio Configuration > LoRa > Transmit Enabled (toggle off)).
NOTES ON SECURITY
It’s no secret that Meshtastic is most popular in the US with the 2A community, so to a savvy criminal anything that affiliates you with Meshtastic could be much akin to the same security concerns with, for example, having an NRA sticker on your vehicle.
Bad actors can spoof nodes on the primary channel (broadcast someone else’s node information), but you can preclude that possibility by “favoriting” known nodes (if two nodes have the same name, the “favorited” one is the real one). Even then, treat everything on the primary channel as suspect.
Broadcasting your approximate location on the Primary channel is helpful to the public mesh, as it assists others in range testing nodes, but it could be a security concern (in general, not just in an operational scenario). While it’s less likely that the approximate location of a fixed node could be exploited, a moving node presents more potential for exploitation by criminals, as that data could be used to track you (e.g. learn your habits, see when you’re not home, etc.). For that reason, I like to set fixed nodes (e.g. base stations) to within a few hundred meters or so, but turn position reporting off completely on the Primary channel for handheld or mobile nodes. The population density determines how safely you can report your fixed position (e.g. if you’re the only house for five miles, any meaningful position report would give away your precise location).
If a radio containing your private channel’s encryption key is lost or stolen, you must consider that channel and key to be compromised and set up a new one. The key can also be compromised if someone hacks your smart device, so securing your smart device is just as important. Best practice is to rotate keys on a regular schedule.
Even encrypted messages can be intercepted and triangulated, so always be mindful that while your encrypted messages can’t be deciphered, any radio transmission essentially broadcasts your position to anyone within range of your signal. Listening is free, however, so if that’s a concern you can always disable TX and only enable it to transmit from random locations when necessary. This is the achilles heel of all wireless signals, but mesh radios have the advantage of conveying lots of information using an extremely short, low powered transmission. Conventional walkie talkies and HF rigs output 5-100 watts of power, and conveying a few sentences of information and a location would take several minutes, whereas LoRa can do that in less than a second with a quarter watt of power.
In the context of SIGINT and electronic warfare, the cost of locating and destroying mesh infrastructure is by definition much, much higher than installing it. To install a fixed node can be as little as twenty dollars in parts and about ten minutes of unskilled labor per node to place (i.e. someone has to climb a tree or rooftop), whereas to simply find that node it would take several hours of skilled labor using advanced equipment (i.e. someone who can intercept, identify, and locate the signal). Once found, the node would then either have to be continuously jammed or physically destroyed by ground or via drone. Given the tiny size, a well camouflaged node would be extremely difficult to find, even if the SIGINT team provides exact coordinates (especially via drone). It’s also extremely easy to block a drone from getting close enough to destroy it, making ground teams the only truly viable option to physically destroy nodes. This makes entire area jamming the only truly viable option, which comes at a very high cost. In the event a decoy node is located and destroyed, you’ve lost twenty dollars in parts and the ten minutes it took someone to place it, whereas they’ve lost hours of skilled labor and potentially hundreds or even thousands of dollars in equipment (drone, artillery, etc.). So in other words, you can afford to “mine” large areas with cheap decoy nodes that will cause you and your higher value base and router nodes to vanish into the crowd. This is effectively already done in urban areas, and that will hold even truer in the near future.
Obviously, walking around transmitting a BLE signal is less than optimal, so if that’s a concern you will have to disable Bluetooth in the radio’s settings and use a serial cable with an Android device (iOS app doesn’t support serial connections at this time). Please see the section NOTES ON DUST, WATER, AND DROP for special concerns while using the device in the field with an active USB-C cable connection.
NOTES ON CONFIGURING MQTT
MQTT allows you to send Meshtastic messages over the internet using your phone’s Wi-Fi or 5G connection. The nRF52s aren’t capable of handling large amounts of traffic, so if enabling MQTT causes the device to behave erratically or stop working altogether, join a less busy Root Topic (or create your own Root Topic (e.g. “my_root_topic”). Practically speaking, these devices can only handle small amounts of MQTT traffic, so the reasonable use case is to only use MQTT to pass messages for your own inner circle, vs. joining a regional group (set unique Root Topic for your group and only enable MQTT on your private encrypted channel).
NOTES ON DUST, WATER, AND DROP
The entire assembly is fully potted in silicone encapsulant, which is degassed at 30 in Hg, so–in addition to excellent drop protection–it’s inherently very dust and water resistant, and it’s unlikely that water is going to be able to penetrate into the electronics in any normal conditions. What’s most vulnerable is the USB-C port, but a simple cover keeps it impervious to dust and highly resistant to splash. The alternative would have been an Amphenal milspec USB-C receptacle, which, besides being very costly, would have dramatically increased the footprint (and requires proprietary cables), and with a little common sense the standard USB-C receptacle shouldn’t present any limitations.
While water in the USB-C port usually isn’t immediately harmful (as long as nothing’s connected), and, most importantly, water shouldn’t be able to migrate from the port into the main board, at least not without significant pressure, repeated or prolonged exposure will corrode the contacts. Silicone USB-C plugs are very effective for splash and even some submersion scenarios, so keep those and use them. Electronics rated protectant oils/dielectric greases are also good if it’s going to be used in wet and or salty conditions, in conjunction with preventing moisture and drying it out quickly if moisture does penetrate.
The main thing is to never power the USB-C port if water is a concern, as this is where immediate damage will occur if water infiltrates the connection and shorts it, which will likely fry the board. Likewise, it’s important to keep the connectors sealed against debris, as any conductive debris can also short it. The philosophy is that given the extremely long battery life, most users won’t have to charge their nodes in the field, but if you need to use a serial connection for security concerns then you’ll have to take extra precautions to protect against water and dust. If you have to use a serial connection in the field, my best advice would be to semi-permanently install the cable by sealing around the connection with silicone, which will also provide some reinforcement to help support the delicate connector.
Also note that SMA connectors aren’t waterproof. The provided antennas do have a little rubber seal, though, which does help. You can use dielectric grease on the threads for some added protection. Sealing around the base with silicone after installing the antenna is of course the foolproof option.
Never ever use general purpose oils or greases or general purpose RTV silicones, as they might contain corrosive chemicals or even conductive particles! If it’s not specifically designed for electronic devices, don’t use it. Even what you might think is just silicone often contains corrosive chemicals that will eat the conductive plating from electrical connectors.
The silicone encapsulant also provides a lot of drop protection to the electronics themselves. If the device is dropped and the housing is damaged, it’s nearly certain that the electronics inside will be fine (within reason), and the silicone is soft enough that the electronics can be reinstalled in a new housing if necessary. The housing being plastic is actually mostly beneficial to the electronics inside, as any drop severe enough to break the housing could be severe enough to damage electronics via shock, so the ductility of the housing provides some shock protection in addition to the silicone potting. ASA (similar to ABS, popular for automotive applications) is also stable at normal temperatures on earth, so basically any temperature that won’t kill you won’t kill it either. So, while you still shouldn’t leave it in a car in the summer (for the battery’s sake, mostly), you don’t have to worry about it melting like typical 3D printed things do. The SMA connector is another story, though, altogether, so do treat them with care. If the antenna base were to become loaded, it’s uncertain whether the SMA connector or housing would give out first (but probably the connector), so be really careful not to stress it. I’ve found the most common way to damage a radio is by dropping it on the SMA connector while swapping antennas. The portion of SMA shell above the dielectric insulator is extremely fragile, and even a short fall can deform or break it off.
The USB-C port is also very fragile when a cable is installed, so be very careful not to load the connector or drop the radio on it!
The TL;DR is that while this device is undoubtedly EXCELLENT for its size, weight, and cost in the durability department, please observe the “if you take care of it, it will take of you” doctrine.
In the event you’re concerned about EMP, the TL;DR is that nobody, not even the experts, really knows, so keep it in a faraday can if that’s in your wheelhouse. HOWEVER, these devices would ALMOST undoubtedly be just fine in most cases, as the conductive elements are teeny tiny and the antennas are relatively short, so it would for sure take an immense amount of energy to induce enough current to damage them. HT radios are generally thought to be low risk for EMP damage, and these are especially low risk due to the very small antennas. Storage with the antenna removed would almost certainly ensure survival (just be sure to disable transmit in the settings before removing the antenna, as always). The risk is of course higher with base nodes with collinear antennas, but there’s not really any way around that, other than by using the smallest antenna possible (like the 3dbi fiberglass ones).
Care should be taken not to expose the battery to high temperatures (or extremely low temperatures). If you live in a hotter region, try to keep it out of the sun and consider painting it a light color, and try to keep it out of direct sunlight as much as possible. Hot temperatures will reduce battery health and in extreme scenarios could potentially cause immediate and irreparable damage. Generally speaking, if you feel like you need shade, so does your battery. Battery chemistry is essentially based on that idea, so don’t leave the node anywhere you wouldn’t want to be yourself. If you’re in the summer sun, consider putting the node inside your pocket.
NOTES ON BATTERY LIFE AND CHARGING
I put gigantic batteries in these radios (note that Base Stations don’t have integrated batteries), which operate at a mere ~10mA (yes, milliamps), so don’t be alarmed when they don’t go from 0% to 100% percent charge in a few hours. A full charge from empty will take up to a week. This is like having a laptop battery the size of a suitcase; it will last practically forever, but it will also take longer to charge to full.
That said, a charge of a few hours, even from a low current source (like a small solar panel), will provide up to several days of use, so don’t worry just because the app says it’s low (it only sees voltage, not actual capacity). Anything over 3v means you have a day or more of normal use. Anything over 4v means you have at least a week of normal use.
The charging circuitry maxes out at 100mA, so even a small solar panel can provide more than enough current to charge them. Or if you’re using a single portable solar solution for all of your devices, these won’t slow down your higher draw devices by any perceptible amount (i.e. charge them from the same panel as your phone, and you won’t notice your phone charging any slower than usual).
Settings impact battery life a lot, as does traffic volume. In standby, the current draw is mere microamps, so with optimized settings these radios can last for over two weeks on a single charge. In a very heavy use scenario, such as a repeater for a busy mesh, that could get cut down to just a few days, so be mindful of the fact that these are handheld transceivers designed for use by a single operator in client mode. While they could be repurposed as routers in a pinch, they weren’t designed to handle heavy traffic.
It’s ideal to not charge past 4v or let the battery fall below about 3.5v during normal use (about 50% and 80% respectively). This will increase battery longevity from around 500 charge cycles to about 2,000 charge cycles. Smart chargers can be used to automatically stop charging at a specified voltage. Not to worry, though, if you do need the full charge, the radio’s charge/discharge curent is so low that it’s already very gentle for such a large battery.
Temperature also has a very heavy impact on battery health, so avoid extreme temperatures, especially hot cars. It is possible that a car in a hot climate can reach a temperature hot enough to cause immediate damage to a lithium battery, and repeated exposure to high temperature can dramatically reduce battery health over time, as the electrolyte inside the cell becomes very corrosive to the lithium at high temperatures.
There is no battery cutoff switch, meaning the device can never be fully turned off. Waterproof switches are bulky and expensive, and with a little common sense these nodes don’t require them due to their extremely low power consumption in deep sleep mode (combined with the absurdly large batteries). The main thing is not to let the battery self discharge below the threshold required to start the battery protection circuit (at which point the device will become unrecoverable). In other words, don’t just toss it in a drawer and leave it for months on end. Make sure you’re charging the device once a month or so. In reality, it will probably take multiple months in most cases for the battery to fall below critical levels after the protection circuit has cut power to the main board. However, these nodes are designed to be constant companions. Even if you’re not actively using the features, they’re constantly exploring and mapping the mesh around you, and discovering new nodes and clearing stale ones. Activity on the primary channel also keeps you informed about local mesh news, like the installation of new routers. Getting the most out of Meshtastic means staying up to date one what’s where, so you will be able to always position yourself to get reception. Like any radio service, half the battle is just knowing where everyone else is, where the dead spots are, and how the terrain and RF around you affects your coverage. If you have accidentally let your battery discharge below critical levels (i.e. it won’t charge), you can first try warming it up while it’s plugged in, such as leaving it in a warm car or in a room with a space heater for several hours, which might put the voltage over the threshold to start charging again. If that doesn’t do the trick, you will have to send it in for battery replacement. If you do need to store it for some time unused, charge it to full, put all settings on power saving, disable transmit, and remove the antenna; these steps will give it the longest “shelf life” possible.
SOFTWARE
RESOURCES
www.discord.com/invite/meshtastic
www.facebook.com/themeshtastic
Don’t hesitate to contact me if you have any questions!